Version management in asp.net Core WebAPI

One of the most important reasons why WebAPIs have gained widespread popularity in recent years is the possibility of strongly decoupling the presentation part from that of the data layer/application layer. This strong decoupling, however, requires that radical changes to the WebAPI do not be to the detriment of those who consume them: if I change an API I should be sure that once changed everything that worked before continues to work in the same way otherwise I could potentially “break” some of the functionality of applications that consume these APIs. The best way to do this is to version the API, but before doing so you need to understand when it is necessary to create a new version of the API and when not. At this link [1] you can find a list of points on which I based my post. The main are the following:

  • Rimove or rename an API or some of its parameters
  • Singificant changes to the AI behaviour
  • Changes to response contract
  • Changes to error code

First we need to define the versions inside the Program.cs. In this case we also define version 1 as the default one.

builder.Services.AddApiVersioning(options =>
{
    options.DefaultApiVersion = new ApiVersion(1);
    options.ReportApiVersions = true;
    options.AssumeDefaultVersionWhenUnspecified = true;
    options.ApiVersionReader = ApiVersionReader.Combine(
        new UrlSegmentApiVersionReader(),
        new HeaderApiVersionReader("X-Api-Version"));
}).AddApiExplorer(options =>
{
    options.GroupNameFormat = "'v'V";
    options.SubstituteApiVersionInUrl = true;
});

Then, it is necessary to decorate the controller with the supported versions and with the consequent dynamic path based on the version

[ApiVersion(1)]
[ApiVersion(2)]
[Route("api/v{v:apiVersion}/[controller]")]
public class InfoAPIController : ControllerBase
{

At this point all the methods that have multiple versions with the same Http Get name but different C# name must be decorated

[MapToApiVersion(1)]
[HttpGet(Name = "GetInfo")] //, Authorize]
public string GetV1(string name)
{
    ...

[MapToApiVersion(2)]
[HttpGet(Name = "GetInfo")] //, Authorize]
public string GetV2(string name)
{

Once this is done we should then be able to use different versions based on the path used. Actually, as explained well in the post below, the methods could be different but I opt for URL-based verisoning.

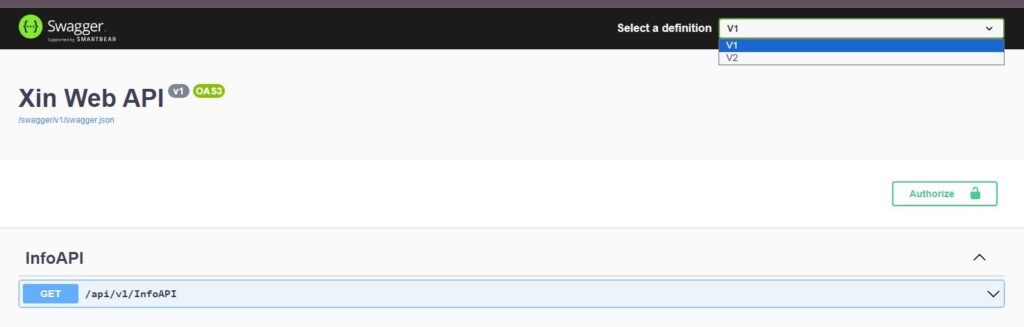
All very nice but all this is not enough to display two different versions in Swagger. To do this you need a couple of other lines of code that I discovered in another post [2]. The first is that the versions visible within the swagger configuration dropdown must be configured (in my case there are two):

builder.Services.AddSwaggerGen(options =>
{
    options.AddSecurityDefinition("oauth2", new OpenApiSecurityScheme
    {
        In = ParameterLocation.Header,
        Name = "authorization",
        Type = SecuritySchemeType.ApiKey
    });

    options.OperationFilter<SecurityRequirementsOperationFilter>();

    options.SwaggerDoc("v1", new OpenApiInfo { Title = "Xin Web API", Version = "v1"});
    options.SwaggerDoc("v2", new OpenApiInfo { Title = "Xin Web API", Version = "v2" });
});

Finally, the version paths must be recorded in SwaggerUI, but instead of doing it one by one I recommend using the approach described here [3]

    app.UseSwaggerUI(options =>
    {
        var descriptions = app.DescribeApiVersions();

        // Build a swagger endpoint for each discovered API version
        foreach (var description in descriptions)
        {
            var url = $"/swagger/{description.GroupName}/swagger.json";
            var name = description.GroupName.ToUpperInvariant();
            options.SwaggerEndpoint(url, name);
        }
    });

Please note that the two steps above are fundamental if you want to correctly display both versions in the swagger drop down and switching between them. The two points above are fundamental.

Swagger con le due versioni selezionabili.

[1] https://www.milanjovanovic.tech/blog/api-versioning-in-aspnetcore

[2] https://dev.to/sardarmudassaralikhan/swagger-implementation-in-aspnet-core-web-api-5a5a

[3] https://mohsen.es/api-versioning-and-swagger-in-asp-net-core-7-0-fe45f67d8419

Manage different Appsettings files based on the Environment target

Working on a solution it is vital that you have the ability to differentiate configurations based on the solution’s “target” environment. The simplest example is that of DB connection strings: if you have different environments you will normally need different strings based on the DB hosted in the related env. In general, for ASP.NET Core projects (and not only) it is possible to manage as many settings as there are release environments, but it is not so trivial to find a way to make this in a dynamic and configurable way. In fact, I found a lot of documentation on how to play with environment variables [1] which however, in the target environment (a cloud solution), I cannot touch. After several hours of searching online for something which may help I landed on this solution which I will explain to you and which you can also partially find in this video.

Definition of release environments: first let’s define which environments my solution must cover to understand how many configuration file variants are needed. In my case there are 4:

  • Development: configuration used in Visual Studio 2022 when I’m developping and debugging
  • Stage: configuration used to test the solution in a ISS local machine
  • Sandbox: preprod environment in cloud
  • Live: final environment in cloud

For each of these environments I will need a dedicated appsettings file formatted in the following way: appsettings.{env}.json. To do this, just copy the appsettings file already present in the solution and rename it using the four names above. Always keep in mind that the first file to be read is appsettings (the generic one) which will then be overwritten by the one with the environment name. This means that anything that claims to be environment specific must end up in the file with the environment name itself.

Loading the correct settings: in the Program.cs we first load the generic appsettings file in which we create a configuration that we identify with Configuration where we will write the deployment target (one of the 4 values ​​above). And based on that value we load the dedicated file.

var _conf = builder.Configuration.AddJsonFile("appsettings.json", optional: true, false).Build();
string _env = _conf.GetSection("Configuration").Value;
builder.Configuration.AddJsonFile($"appsettings.{_env}.json", optional: true, false);

var app = builder.Build();

This means that the environment target will be defined in the Appsettings.json file under the Configuration property.

Release only the environment files: as done above and substantially also shown in the video, all appsettings files will always be delivered in all environments and I don’t like this very much because it lends itself to errors if I don’t correctly modify the Configuration at the internal of the generic appsettings. To overcome this problem I generate 3 new configuration versions from the configuration manager: Live, Sandbox and Stage. At this point I open the project file in edit and add the following configuration which releases only the correct file based on the target I have chosen.

	<Choose>
		<When Condition="'$(Configuration)' == 'Live'">
			<ItemGroup>
				<None Include="appsettings.Live.json" CopyToOutputDirectory="Always" CopyToPublishDirectory="Always" />
				<None Include="appsettings.json" CopyToOutputDirectory="Never" CopyToPublishDirectory="Never" />
				<Content Remove="appsettings.*.json;appsettings.json" />
			</ItemGroup>
		</When>
		<When Condition="'$(Configuration)' == 'Sandbox'">
			<ItemGroup>
				<None Include="appsettings.Sandbox.json" CopyToOutputDirectory="Always" CopyToPublishDirectory="Always" />
				<None Include="appsettings.json" CopyToOutputDirectory="Never" CopyToPublishDirectory="Never" />
				<Content Remove="appsettings.*.json;appsettings.json" />
			</ItemGroup>
		</When>
		<When Condition="'$(Configuration)' == 'Stage'">
			<ItemGroup>
				<None Include="appsettings.Stage.json" CopyToOutputDirectory="Always" CopyToPublishDirectory="Always" />
				<None Include="appsettings.json" CopyToOutputDirectory="Never" CopyToPublishDirectory="Never" />
				<Content Remove="appsettings.*.json;appsettings.json" />
			</ItemGroup>
		</When>
		<Otherwise>
			<ItemGroup>
				<None Include="appsettings.Development.json" CopyToOutputDirectory="Always" CopyToPublishDirectory="Always" />
				<None Include="appsettings.json" CopyToOutputDirectory="Never" CopyToPublishDirectory="Never" />
				<Content Remove="appsettings.*.json;appsettings.json" />
			</ItemGroup>
		</Otherwise>
	</Choose>

In this way, before releasing in one of the environments, simply select the deployment type and only the relevant configuration files will be released.

[1] https://learn.microsoft.com/en-us/aspnet/core/fundamentals/configuration/?view=aspnetcore-8.0#evcp

Easy log with asp.net core: Serilog

It is well known why logging is a key point in the development of an application. It is also useless to say how non-sense it is today to develop a custom framework that does this: there are a thousand plugins that do it (and often very well) so you are truly spoiled for choice. However, not all of them are easy to set up (some are a real nightmare). My choice is SeriLog. You can find a lot of documentation on the subject on the web, I suggest a couple of them below at the bottom of the post.

Specifically, these are the actions I carried out to install and configure it:

  • Download from NuGet Packages Manager the package Serilog.AspNetCore
  • Initialize the Logger within Program.cs
var logger = new LoggerConfiguration()
    .ReadFrom.Configuration(builder.Configuration)
    .Enrich.FromLogContext()
    .CreateLogger();

builder.Logging.ClearProviders();
builder.Logging.AddSerilog(logger);
  • Add in the file appsettings.js the write configurations, like the name of the file, where it is located etc…
"Serilog": {
  "Using": [ "Serilog.Sinks.File" ],
  "MinimumLevel": {
    "Default": "Information"
  },
  "WriteTo": [
    {
      "Name": "File",
      "Args": {
        "path": "../APIlogs/webapi-WebAPICoreAuthBearer.log",
        "rollingInterval": "Day",
        "outputTemplate": "[{Timestamp:yyyy-MM-dd HH:mm:ss.fff zzz} {CorrelationId} {Level:u3}] {Username} {Message:lj}{NewLine}{Exception}"
      }
    }
  ]
}

With these simple actions your system will be already able to log. If you need to explicitly log into your controllers in the case of an API, of course, just use the usual “injective” mode.

 private readonly ILogger<InfoAPIController> _logger;
 private readonly IConfiguration _configuration;

 public InfoAPIController(ILogger<InfoAPIController> logger, IConfiguration iConfig)
 {
     _logger = logger;
     _configuration = iConfig;
 }

 [HttpGet(Name = "GetInfo")] ]
 public InfoAPI Get()
 {
     _logger.Log(LogLevel.Information, "GetInfo");
....

[1] https://www.claudiobernasconi.ch/2022/01/28/how-to-use-serilog-in-asp-net-core-web-api/

[2] https://www.youtube.com/watch?v=QjO2Jac1uQw

[3] https://www.milanjovanovic.tech/blog/5-serilog-best-practices-for-better-structured-logging

Comics Catalog – My first Web API

I’m a good comic reader since I was young. I have a lot of comics, mainly Marvel, and I would like a way to easely catalog them a browse when needed. For this reason I would like to create an app where to add and catalog them. Let’s start then from the smaller concept possible: a table on a datatbase (SQL Server) defining a first embrional concept of Comic like the below:

  • ID: identifier unique
  • Series: name of the Comic serie
  • Title: title of the specic comic
  • Number: progressive number of the comic within the Series

I’m creating this on an empty SQL Database calog and in a Table named “Comic”

Comic Table

Let’s move now to VisualStudio 2019 IDE to create the Web API Project

ASP NET Web Application

I will name the project XinCataLogAPI

Create Project

As target Framework I’m chosing 4.7.2 the latest one, for the template we need to choose Web API with no authentication (I saw in a lot of example this is not used, maybe I’m wrong).

Web API Template

Ok, now the empty projet is created, I’ll build the project and run it in debug and voilà, the default WebApp is running.

ASP.NET Web App

let’s add the project to the GitHub repository to ensure have a Source Control repository where to push and pull the versions.

Since we need to play with the EntityFramework to retrieve and manage the CRUD operation I’ll add a new Item to the solution under the MODEL Folder chosing the “ADO.NET Entity Data Model” and I’ll name it DBModel

ADO.NET Entity

Now in the wizard which is opening let’s chose the Database First option:

Database First Option

In the modal opening select the DB

Database Connection

As option I chose the Entity Framework 6.x and then from the list of the object the Table XinComic:

XinComic Table

Once pressed Finish the Diagram will popup showing the object selected and will generate a set of items under the Model Folder.

Model

Before move ahead let’s spend a minute on two of the classes generated by the wizard:

  • DBModel.Context.cs class is the one which is used to communicate with the Database
  • XinComic.cs is the entity representing the Database table XinComic

Now that we have the classes which model the DB and create the DB we can move ahead. Tipically an API can provide the basic functionality to access to Database objects and more in details the four main HTTP methods (GET, PUT, POST, and DELETE) can be mapped to CRUD operations as follows (see also here [2]):

  • GET retrieves the representation of the resource at a specified URI. GET should have no side effects on the server.
  • PUT updates a resource at a specified URI. PUT can also be used to create a new resource at a specified URI, if the server allows clients to specify new URIs. For this tutorial, the API will not support creation through PUT.
  • POST creates a new resource. The server assigns the URI for the new object and returns this URI as part of the response message.
  • DELETE deletes a resource at a specified URI.

Since we have already a Model class created as above we can now move to create a Controller to implement the functionality above. To this let’s click on the Controller Folder and add a new controller like below

Web API Controller with Read/Write actions

In the modal opening I just need then to specify the Model and the Repository created before

XinComicsController

Then, after some actions from the wizard you should get the Controller correctly created: now in the controller folder I have a all the CRUD operation for my Comic:

XinComicsController

Ok, looks good, now if we rebuild the project, pressing the API top link we are direct to a page containing the list of the methods available:

List of API and Methods

If we now put the url of the Get Method we can test the functionality:

Get Method result

That is great but if we want to test the methods which requires a body it is not so straightful. In this case you may need to use an tool like Postman or Reqbin which can so the request to simulate the payloads like you can see below:

API POST Test

This can prove you the service is correctly replying. Another possibility, which a I prefer, is to leverage on Swagger to have a very intuitive way to test the API. I f you are interested please have a look to this post [4]. If you would have a look to this code please check this out [5] in my GitHub repository.

[1] https://docs.microsoft.com/en-us/answers/questions/357012/can39t-find-adonet-entity-data-model-missing-visua.html

[2] https://docs.microsoft.com/en-us/aspnet/web-api/overview/older-versions/creating-a-web-api-that-supports-crud-operations

[3] https://stackoverflow.com/questions/45139243/asp-net-core-scaffolding-does-not-work-in-vs-2017

[4] https://www.beren.it/en/2022/03/26/comic-catalog-my-first-swagger-web-api/

[5] https://github.com/stepperxin/XinCataLogAPI

Comic Catalog – My first Swagger Web API

I’m a good comic reader since I was young. I have a lot of comics, mainly Marvel, and I would like a way to easely catalog them a browse when needed. For this reason I would like to create an app where to add and catalog them. Let’s start then from the smaller concept possible: a table on a datatbase (SQL Server) defining a first embrional concept of Comic like the below:

  • ID: identifier unique
  • Series: name of the Comic serie
  • Title: title of the specic comic
  • Number: progressive number of the comic within the Series

I’m creating this on an empty SQL Database calog and in a Table named “Comic”

Comic Table

Let’s move now to VisualStudio 2019 IDE to create the Web API Project

ASP NET Core Web API Template

I will name the project XinCataLogAPI

Create Project

As target Framework I’m chosing the 5.0 which is the current one, for the moment I’ll leave the Authentication Type to None (I see on the web multiple example which are not using it)

Framework and Authentication

Ok, now the empty projet is created with a demo class WeatherForecast to demonstrate it can work. Let’s run then the project and here we go:

Swagger API interface

We have the Swagger repesentation for our WebAPI, of course the methods are just a demo, but as starting point this is cool enough.

Let’s add the project to the GitHub repository to ensure have a Source Control repository where to push and pull the versions. This is just a seiggestion but I strognly recommed to push a checkpoint all the time you have a version stable enough so you are able to comeback in case something you did (even unintentionally) mess-up your work. Since we need to play with the EntityFramework to retrieve and manage the CRUD operation on SQL Server I will add the NuGet related package taking care of the latest compatible version.

EntityFrameworkCore 5.0.15

Then we need to do this also for the packages of Tools and SQLServer. After this the full list of packages installed should be the below:

NuGet Packages

In the past I remember I played with an useful wizard to work with Database First approach, which basically generate a Data model starting from the Database I need to work with. Unfortunately I was not able to retrieve it and looks like this is because with .NET Core there is no way to add ADO Entity Model ad object [1]. Anyway there is the possibility to do the same leveraging on some command on the Package Manager Console. Let’s open it then and add the following command:

Scaffold-DBContext "Server=WIN-7O15VR47QA6;Database=XinCataLog;Trusted_Connection=True;"  Microsoft.EntityFrameworkCore.SqlServer -OutputDir "Models" -Tables XinComic -f  

This command tells which entities (in this case only the XinComic) to scaffold in the Models directory and you can see below the result.

Package Manager Command
Models Folder

The XinCataLogContext class is the one which is used to communicate with the Database, while the XinComic is the entity representing the Database table.

Tipically an API can provide the basic functionality to access to Database objects and more in details the four main HTTP methods (GET, PUT, POST, and DELETE) can be mapped to CRUD operations as follows (see also here [2]):

  • GET retrieves the representation of the resource at a specified URI. GET should have no side effects on the server.
  • PUT updates a resource at a specified URI. PUT can also be used to create a new resource at a specified URI, if the server allows clients to specify new URIs. For this tutorial, the API will not support creation through PUT.
  • POST creates a new resource. The server assigns the URI for the new object and returns this URI as part of the response message.
  • DELETE deletes a resource at a specified URI.

Since we have already a Model class created as above we can now move to create a Controller to implement the functionality above. To this let’s click on the Controller Folder and add a new controller like below

API Controller with Actions using EntityFramework

In the modal opening I just need then to specify the Model and the Repository created before

XinComicsController

Then, after some actions from the wizard you should get the Controller correctly created.

Actually the first time I did it I got a weird error “Unhandled exception. System.IO.FileNotFoundException: Could not load file or assembly ‘Microsoft.VisualStudio.Web.CodeGeneration.Utils, Version=5.0.2.0, Culture=neutral, PublicKeyToken=adb9793829ddae60’. The system cannot find the file specified. File name: ‘Microsoft.VisualStudio.Web.CodeGeneration.Utils, Version=5.0.2.0, Culture=neutral, PublicKeyToken=adb9793829ddae60′” which fortunately I solved with the help of StackOverflow [3]. If it is not the case for you better, otherwise this fixed the issue for me.

Here we go, now in the controller folder I have a all the CRUD operation for my Comic:

XinComicsController

Well we should be almost there but if run the application we do find the new methods within the Swagger interface

XinComics methods

but if we run the get method we got an error:

System.InvalidOperationException: Unable to resolve service for type 'XinCataLogSwaggerWebAPI.Models.XinCataLogContext' while attempting to activate 'XinCataLogSwaggerWebAPI.Controllers.XinComicsController'.

which is meaning that we have an issues with the initializzation of the XinCataLogContext. Actually we didn’t register the DataContext within the services and also described here [4].

        // This method gets called by the runtime. Use this method to add services to the container.
        public void ConfigureServices(IServiceCollection services)
        {
            services.AddDbContext<XinCataLogContext>(options =>
              options.UseSqlServer(Configuration.GetConnectionString("DefaultSQLServerConnection")));

            services.AddControllers();
            services.AddSwaggerGen(c =>
            {
                c.SwaggerDoc("v1", new OpenApiInfo { Title = "XinCataLogSwaggerWebAPI", Version = "v1" });
            });
        }

The first line of the method is registering as DBContext the one we generated with the Scaffold-DBContext. Now before run again the aplication let’s add a connectionstring in the appsettings file to ensure the connection string is the right one.

  "ConnectionStrings": {
    "DefaultSQLServerConnection": "Server=WIN-7O15VR47QA6;Database=XinCataLog;Trusted_Connection=True;"
  }

That’s it: if you now run the app and try the methods they are working good: we got the first API (with swagger) basically writing only coupleof line of code: the large part of the actions are done by VisualStudio.

Get method from Database

[1] https://docs.microsoft.com/en-us/answers/questions/357012/can39t-find-adonet-entity-data-model-missing-visua.html

[2] https://docs.microsoft.com/en-us/aspnet/web-api/overview/older-versions/creating-a-web-api-that-supports-crud-operations

[3] https://stackoverflow.com/questions/45139243/asp-net-core-scaffolding-does-not-work-in-vs-2017

[4] https://docs.microsoft.com/en-us/aspnet/core/data/ef-mvc/intro?view=aspnetcore-6.0#register-the-schoolcontext