It’s already been a year—one that, I could say, has quite literally flown by—since last April 23rd, when Edo entered our lives and changed them completely. I don’t want to get too caught up in analyzing how things were before and what has changed since; I was fully aware that a change like this would turn everything upside down.
It’s easier to talk about sleepless nights (which were actually very few), diapers, baby food, and cries (also quite rare)… but it’s much more complex to describe the beauty behind it all. And here I must get a little cliché: only those who have truly experienced it can fully understand.
No one is ever really ready to be a parent—at least not with the first child. It takes a lot of effort to accept your own limitations and learn to live with them, always trying your best, without letting it become a source of frustration.
I’ll always remember that strange, slightly worried feeling of no longer being just the two of us at home, but having another little being there, breathing the same air, completely dependent on our attention—and equally affected by our shortcomings.
At times, the fear of not doing the right thing, of simply being inadequate, can be paralyzing. But that feeling belongs to a moment, not a permanent state. Over these past months, I’ve rediscovered what instinct really is—something our evolved society tries hard to regulate and channel into socially acceptable behaviors, governed by logic and common sense.
But the irrationality of instinct—especially in adults—is usually restricted to very specific areas. A newborn, however, breaks down all those barriers, mostly because… how can you explain them to him?
And that opens up a completely different horizon. It forces you to put yourself fully on the line—not just with your free time, but in every single part of daily life. It’s a strange kind of rediscovery, but a truly fascinating one.
Watching your child nibble on a cookie without panicking every time it looks like he’s about to choke or throw up—that takes instinct, and a calmness that isn’t always easy to access or explain.
But let’s get back to the best part: How amazing is it to hold your child in your arms? How magical is it to hold their tiny hand as they try to stand up, or when they point at something completely random? How deeply does their toothless smile and innocent gaze fill your heart?
At night, you’re often exhausted—barely able to drag yourself to bed—and yet watching them go full speed between a stuffed animal, a ball, or a toy car is, in a strange way, restorative.
Having a child—especially when you’re not that young anymore, like me—makes you look at the future with hope, with joy, with curiosity and wonder. It stretches your life by shortening your days.
One of the most important reasons why WebAPIs have gained widespread popularity in recent years is the possibility of strongly decoupling the presentation part from that of the data layer/application layer. This strong decoupling, however, requires that radical changes to the WebAPI do not be to the detriment of those who consume them: if I change an API I should be sure that once changed everything that worked before continues to work in the same way otherwise I could potentially “break” some of the functionality of applications that consume these APIs. The best way to do this is to version the API, but before doing so you need to understand when it is necessary to create a new version of the API and when not. At this link [1] you can find a list of points on which I based my post. The main are the following:
Rimove or rename an API or some of its parameters
Singificant changes to the AI behaviour
Changes to response contract
Changes to error code
First we need to define the versions inside the Program.cs. In this case we also define version 1 as the default one.
Once this is done we should then be able to use different versions based on the path used. Actually, as explained well in the post below, the methods could be different but I opt for URL-based verisoning.
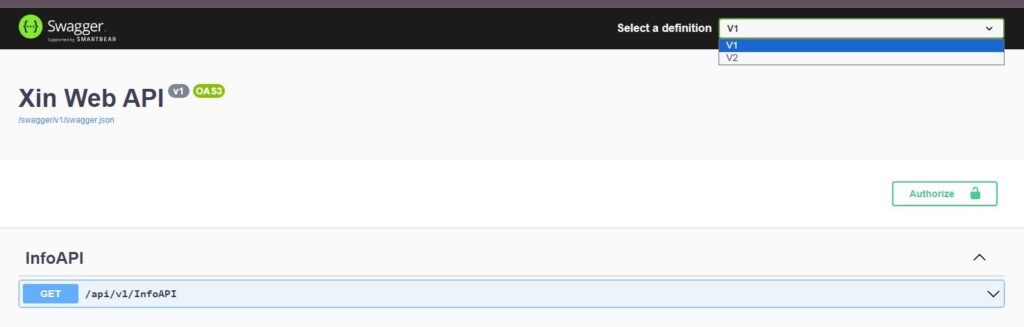
All very nice but all this is not enough to display two different versions in Swagger. To do this you need a couple of other lines of code that I discovered in another post [2]. The first is that the versions visible within the swagger configuration dropdown must be configured (in my case there are two):
Program.cs
builder.Services.AddSwaggerGen(options =>{
options.AddSecurityDefinition("oauth2",newOpenApiSecurityScheme{
In = ParameterLocation.Header,
Name ="authorization",
Type = SecuritySchemeType.ApiKey
});
options.OperationFilter<SecurityRequirementsOperationFilter>();
options.SwaggerDoc("v1",newOpenApiInfo{ Title ="Xin Web API", Version ="v1"});
options.SwaggerDoc("v2",newOpenApiInfo{ Title ="Xin Web API", Version ="v2"});});
Finally, the version paths must be recorded in SwaggerUI, but instead of doing it one by one I recommend using the approach described here [3]
Program.cs
app.UseSwaggerUI(options =>{var descriptions = app.DescribeApiVersions();// Build a swagger endpoint for each discovered API versionforeach(var description in descriptions){var url =$"/swagger/{description.GroupName}/swagger.json";var name = description.GroupName.ToUpperInvariant();
options.SwaggerEndpoint(url, name);}});
Please note that the two steps above are fundamental if you want to correctly display both versions in the swagger drop down and switching between them. The two points above are fundamental.
Working on a solution it is vital that you have the ability to differentiate configurations based on the solution’s “target” environment. The simplest example is that of DB connection strings: if you have different environments you will normally need different strings based on the DB hosted in the related env. In general, for ASP.NET Core projects (and not only) it is possible to manage as many settings as there are release environments, but it is not so trivial to find a way to make this in a dynamic and configurable way. In fact, I found a lot of documentation on how to play with environment variables [1] which however, in the target environment (a cloud solution), I cannot touch. After several hours of searching online for something which may help I landed on this solution which I will explain to you and which you can also partially find in this video.
Definition of release environments: first let’s define which environments my solution must cover to understand how many configuration file variants are needed. In my case there are 4:
Development: configuration used in Visual Studio 2022 when I’m developping and debugging
Stage: configuration used to test the solution in a ISS local machine
Sandbox: preprod environment in cloud
Live: final environment in cloud
For each of these environments I will need a dedicated appsettings file formatted in the following way: appsettings.{env}.json. To do this, just copy the appsettings file already present in the solution and rename it using the four names above. Always keep in mind that the first file to be read is appsettings (the generic one) which will then be overwritten by the one with the environment name. This means that anything that claims to be environment specific must end up in the file with the environment name itself.
Loading the correct settings: in the Program.cs we first load the generic appsettings file in which we create a configuration that we identify with Configuration where we will write the deployment target (one of the 4 values above). And based on that value we load the dedicated file.
This means that the environment target will be defined in the Appsettings.json file under the Configuration property.
Release only the environment files: as done above and substantially also shown in the video, all appsettings files will always be delivered in all environments and I don’t like this very much because it lends itself to errors if I don’t correctly modify the Configuration at the internal of the generic appsettings. To overcome this problem I generate 3 new configuration versions from the configuration manager: Live, Sandbox and Stage. At this point I open the project file in edit and add the following configuration which releases only the correct file based on the target I have chosen.
In this way, before releasing in one of the environments, simply select the deployment type and only the relevant configuration files will be released.
It is well known why logging is a key point in the development of an application. It is also useless to say how non-sense it is today to develop a custom framework that does this: there are a thousand plugins that do it (and often very well) so you are truly spoiled for choice. However, not all of them are easy to set up (some are a real nightmare). My choice is SeriLog. You can find a lot of documentation on the subject on the web, I suggest a couple of them below at the bottom of the post.
Specifically, these are the actions I carried out to install and configure it:
var logger =newLoggerConfiguration().ReadFrom.Configuration(builder.Configuration).Enrich.FromLogContext().CreateLogger();
builder.Logging.ClearProviders();
builder.Logging.AddSerilog(logger);
Add in the file appsettings.js the write configurations, like the name of the file, where it is located etc…
With these simple actions your system will be already able to log. If you need to explicitly log into your controllers in the case of an API, of course, just use the usual “injective” mode.
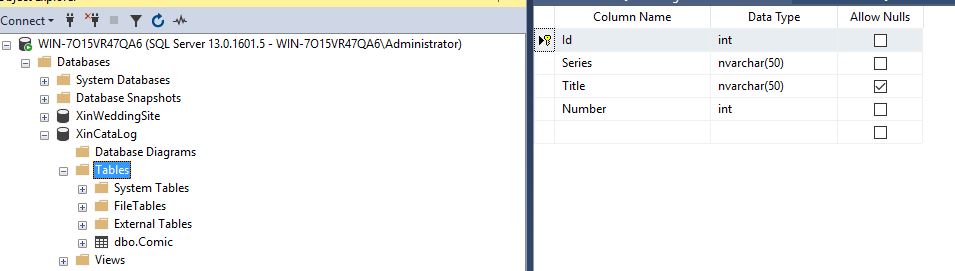
I’m a good comic reader since I was young. I have a lot of comics, mainly Marvel, and I would like a way to easely catalog them a browse when needed. For this reason I would like to create an app where to add and catalog them. Let’s start then from the smaller concept possible: a table on a datatbase (SQL Server) defining a first embrional concept of Comic like the below:
ID: identifier unique
Series: name of the Comic serie
Title: title of the specic comic
Number: progressive number of the comic within the Series
I’m creating this on an empty SQL Database calog and in a Table named “Comic”
Comic Table
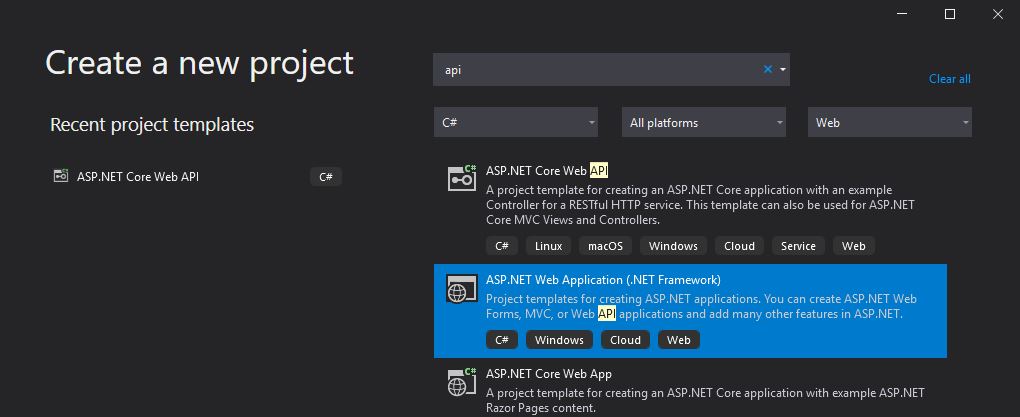
Let’s move now to VisualStudio 2019 IDE to create the Web API Project
ASP NET Web Application
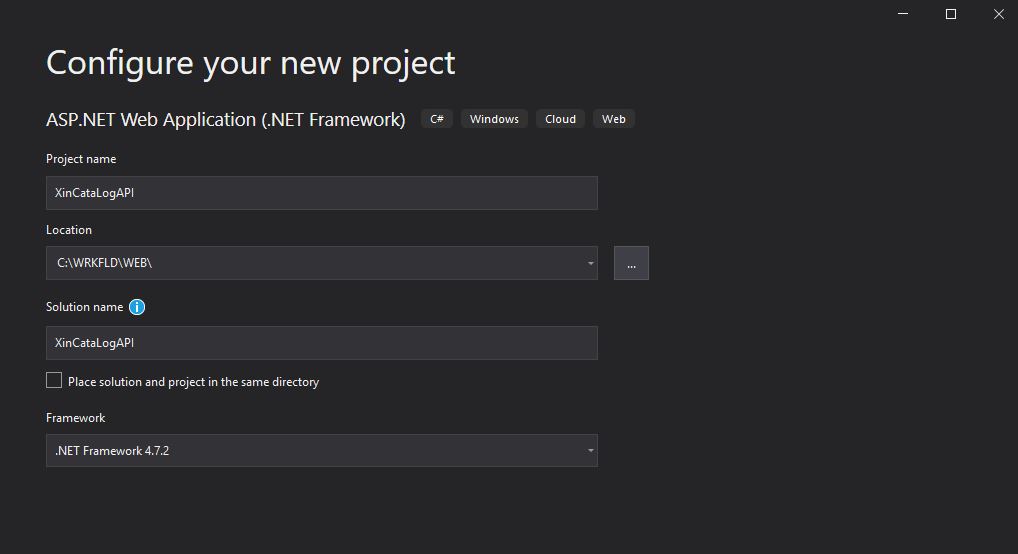
I will name the project XinCataLogAPI
Create Project
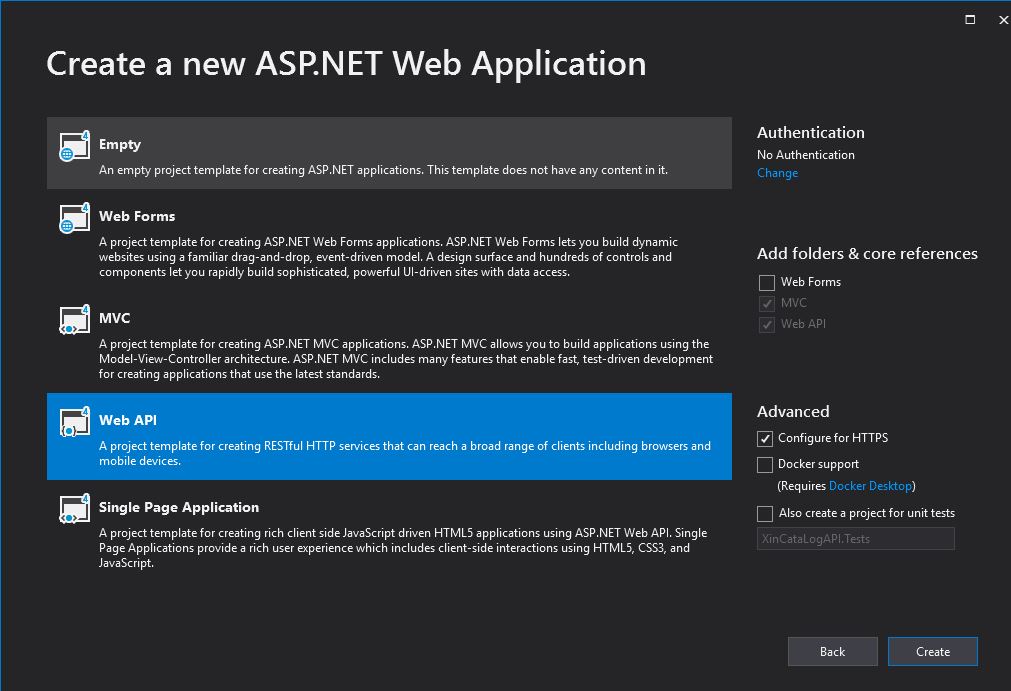
As target Framework I’m chosing 4.7.2 the latest one, for the template we need to choose Web API with no authentication (I saw in a lot of example this is not used, maybe I’m wrong).
Web API Template
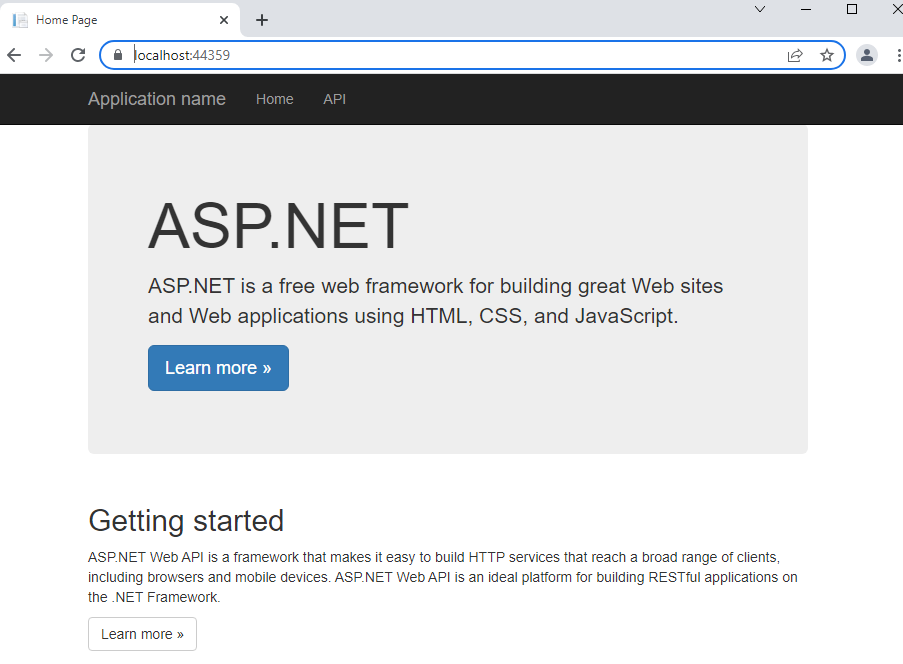
Ok, now the empty projet is created, I’ll build the project and run it in debug and voilà, the default WebApp is running.
ASP.NET Web App
let’s add the project to the GitHub repository to ensure have a Source Control repository where to push and pull the versions.
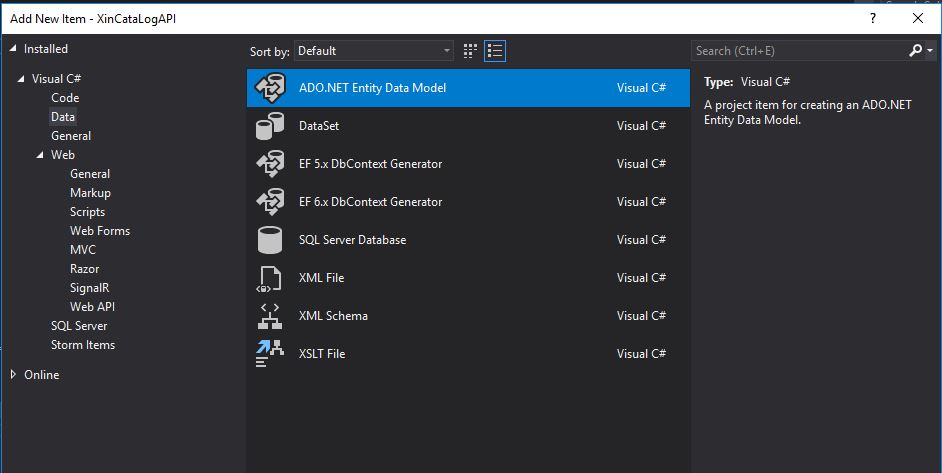
Since we need to play with the EntityFramework to retrieve and manage the CRUD operation I’ll add a new Item to the solution under the MODEL Folder chosing the “ADO.NET Entity Data Model” and I’ll name it DBModel
ADO.NET Entity
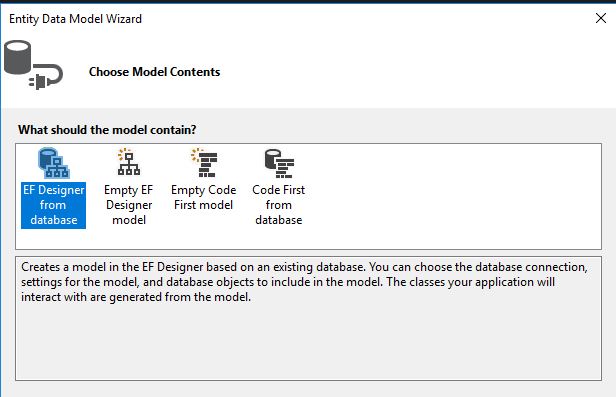
Now in the wizard which is opening let’s chose the Database First option:
Database First Option
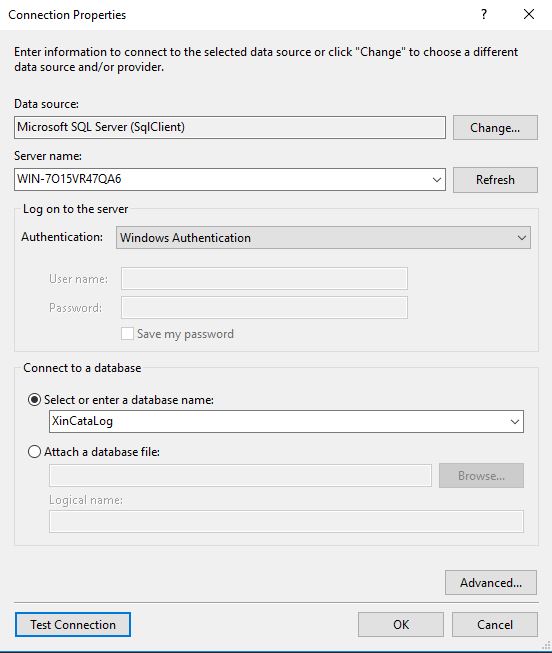
In the modal opening select the DB
Database Connection
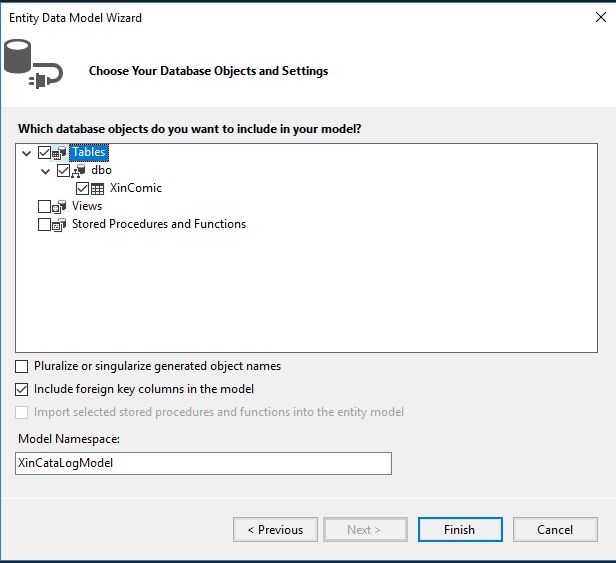
As option I chose the Entity Framework 6.x and then from the list of the object the Table XinComic:
XinComic Table
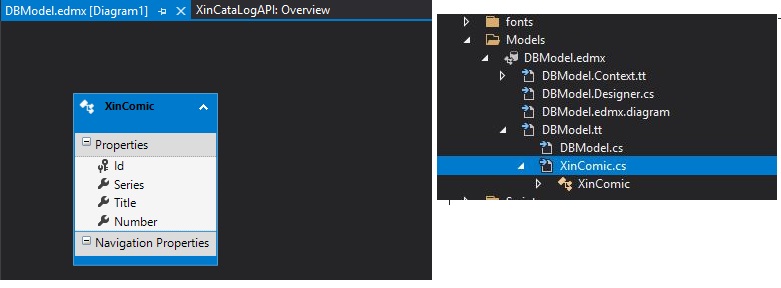
Once pressed Finish the Diagram will popup showing the object selected and will generate a set of items under the Model Folder.
Model
Before move ahead let’s spend a minute on two of the classes generated by the wizard:
DBModel.Context.cs class is the one which is used to communicate with the Database
XinComic.cs is the entity representing the Database table XinComic
Now that we have the classes which model the DB and create the DB we can move ahead. Tipically an API can provide the basic functionality to access to Database objects and more in details the four main HTTP methods (GET, PUT, POST, and DELETE) can be mapped to CRUD operations as follows (see also here [2]):
GET retrieves the representation of the resource at a specified URI. GET should have no side effects on the server.
PUT updates a resource at a specified URI. PUT can also be used to create a new resource at a specified URI, if the server allows clients to specify new URIs. For this tutorial, the API will not support creation through PUT.
POST creates a new resource. The server assigns the URI for the new object and returns this URI as part of the response message.
DELETE deletes a resource at a specified URI.
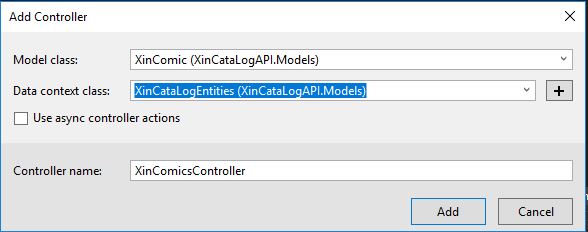
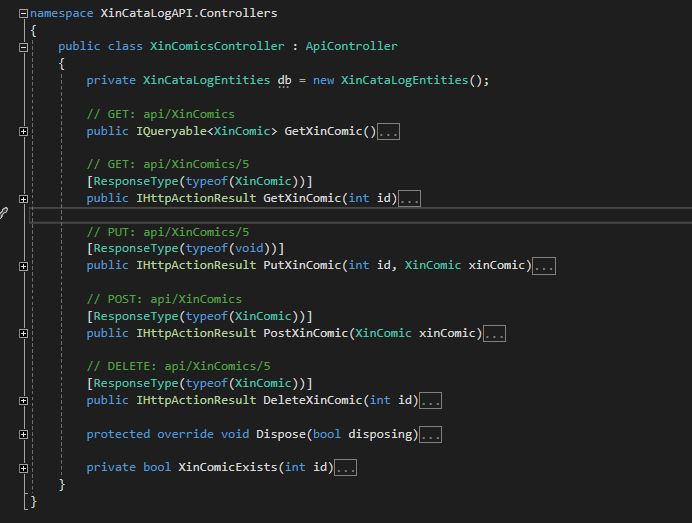
Since we have already a Model class created as above we can now move to create a Controller to implement the functionality above. To this let’s click on the Controller Folder and add a new controller like below
Web API Controller with Read/Write actions
In the modal opening I just need then to specify the Model and the Repository created before
XinComicsController
Then, after some actions from the wizard you should get the Controller correctly created: now in the controller folder I have a all the CRUD operation for my Comic:
XinComicsController
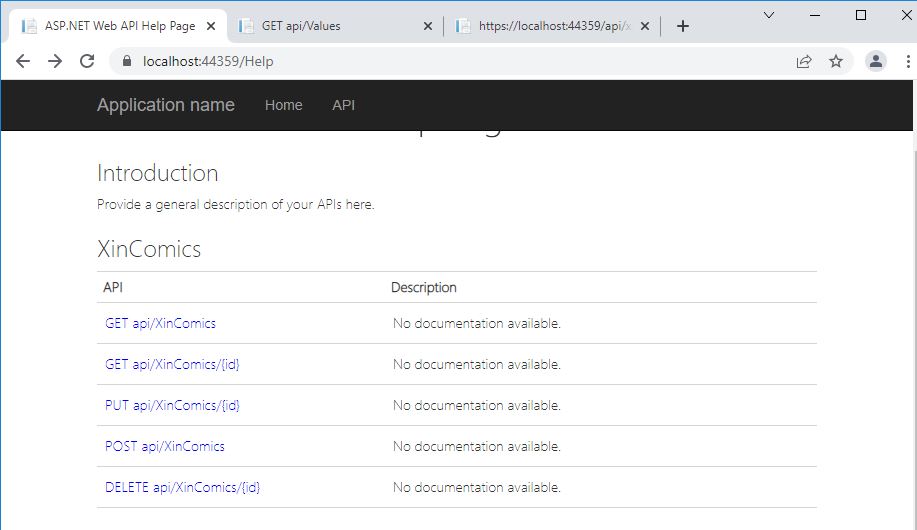
Ok, looks good, now if we rebuild the project, pressing the API top link we are direct to a page containing the list of the methods available:
List of API and Methods
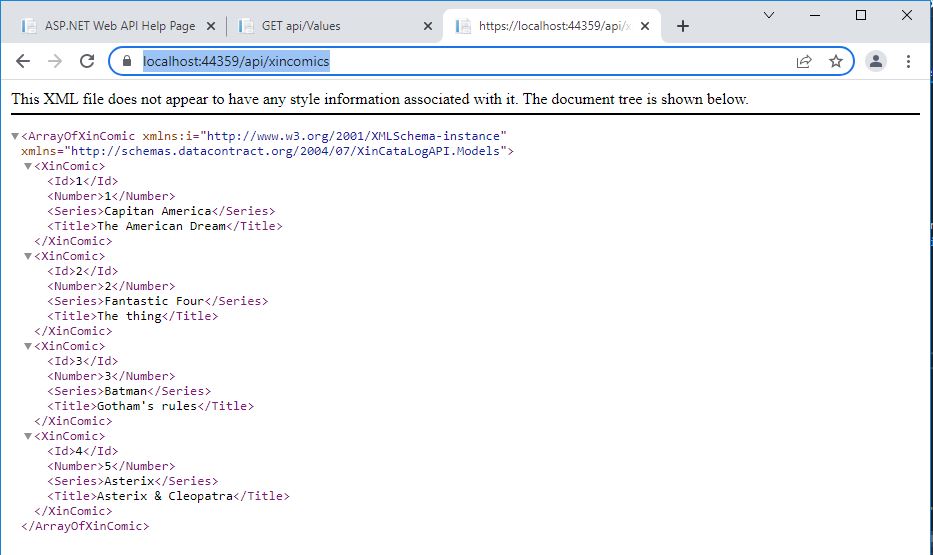
If we now put the url of the Get Method we can test the functionality:
Get Method result
That is great but if we want to test the methods which requires a body it is not so straightful. In this case you may need to use an tool like Postman or Reqbin which can so the request to simulate the payloads like you can see below:
API POST Test
This can prove you the service is correctly replying. Another possibility, which a I prefer, is to leverage on Swagger to have a very intuitive way to test the API. I f you are interested please have a look to this post [4]. If you would have a look to this code please check this out [5] in my GitHub repository.
I’m a good comic reader since I was young. I have a lot of comics, mainly Marvel, and I would like a way to easely catalog them a browse when needed. For this reason I would like to create an app where to add and catalog them. Let’s start then from the smaller concept possible: a table on a datatbase (SQL Server) defining a first embrional concept of Comic like the below:
ID: identifier unique
Series: name of the Comic serie
Title: title of the specic comic
Number: progressive number of the comic within the Series
I’m creating this on an empty SQL Database calog and in a Table named “Comic”
Comic Table
Let’s move now to VisualStudio 2019 IDE to create the Web API Project
ASP NET Core Web API Template
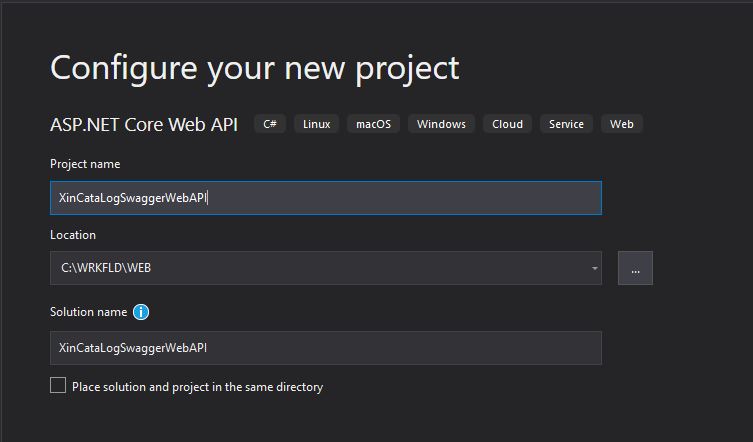
I will name the project XinCataLogAPI
Create Project
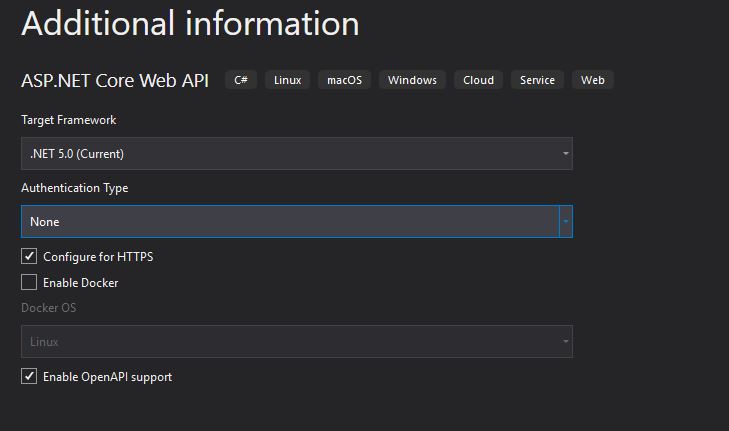
As target Framework I’m chosing the 5.0 which is the current one, for the moment I’ll leave the Authentication Type to None (I see on the web multiple example which are not using it)
Framework and Authentication
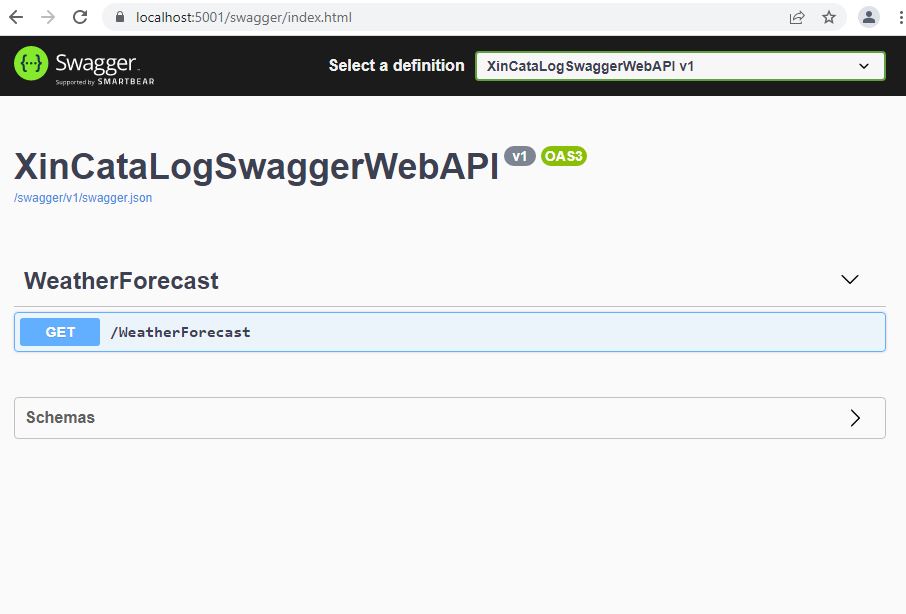
Ok, now the empty projet is created with a demo class WeatherForecast to demonstrate it can work. Let’s run then the project and here we go:
Swagger API interface
We have the Swagger repesentation for our WebAPI, of course the methods are just a demo, but as starting point this is cool enough.
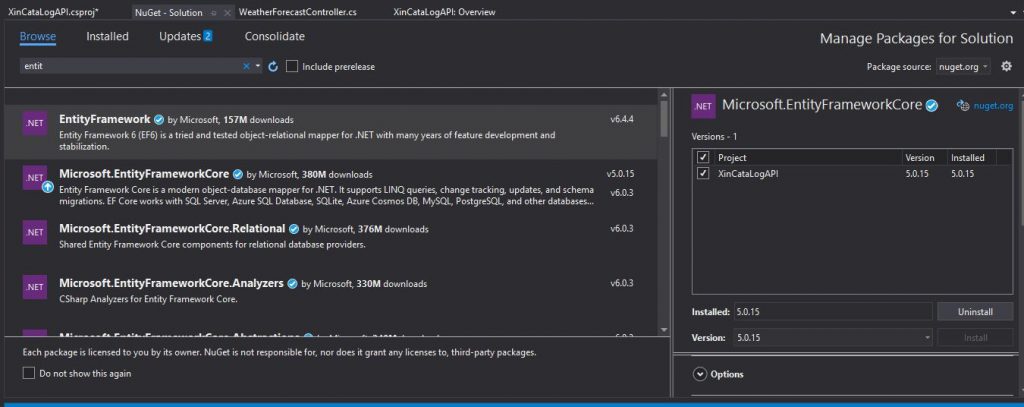
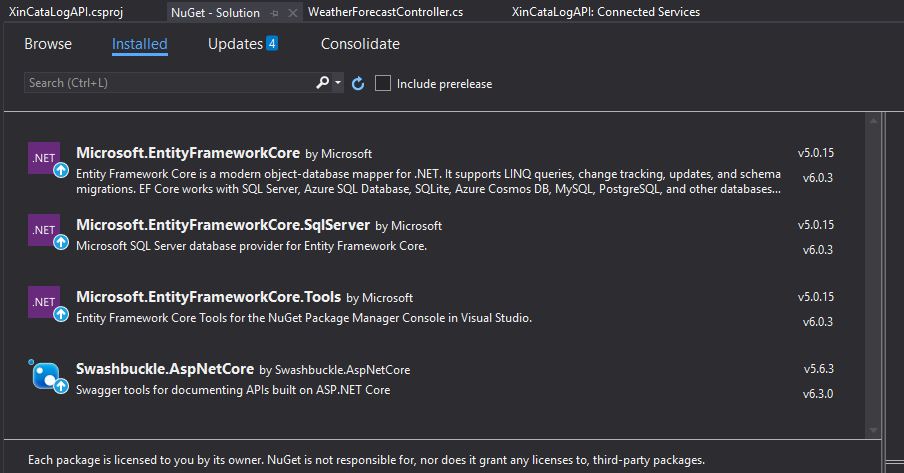
Let’s add the project to the GitHub repository to ensure have a Source Control repository where to push and pull the versions. This is just a seiggestion but I strognly recommed to push a checkpoint all the time you have a version stable enough so you are able to comeback in case something you did (even unintentionally) mess-up your work. Since we need to play with the EntityFramework to retrieve and manage the CRUD operation on SQL Server I will add the NuGet related package taking care of the latest compatible version.
EntityFrameworkCore 5.0.15
Then we need to do this also for the packages of Tools and SQLServer. After this the full list of packages installed should be the below:
NuGet Packages
In the past I remember I played with an useful wizard to work with Database First approach, which basically generate a Data model starting from the Database I need to work with. Unfortunately I was not able to retrieve it and looks like this is because with .NET Core there is no way to add ADO Entity Model ad object [1]. Anyway there is the possibility to do the same leveraging on some command on the Package Manager Console. Let’s open it then and add the following command:
This command tells which entities (in this case only the XinComic) to scaffold in the Models directory and you can see below the result.
Package Manager Command
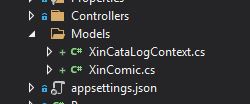
Models Folder
The XinCataLogContext class is the one which is used to communicate with the Database, while the XinComic is the entity representing the Database table.
Tipically an API can provide the basic functionality to access to Database objects and more in details the four main HTTP methods (GET, PUT, POST, and DELETE) can be mapped to CRUD operations as follows (see also here [2]):
GET retrieves the representation of the resource at a specified URI. GET should have no side effects on the server.
PUT updates a resource at a specified URI. PUT can also be used to create a new resource at a specified URI, if the server allows clients to specify new URIs. For this tutorial, the API will not support creation through PUT.
POST creates a new resource. The server assigns the URI for the new object and returns this URI as part of the response message.
DELETE deletes a resource at a specified URI.
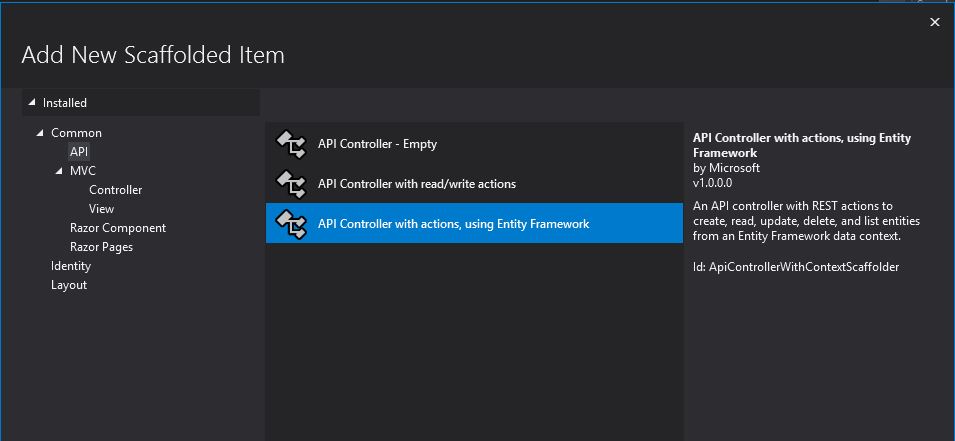
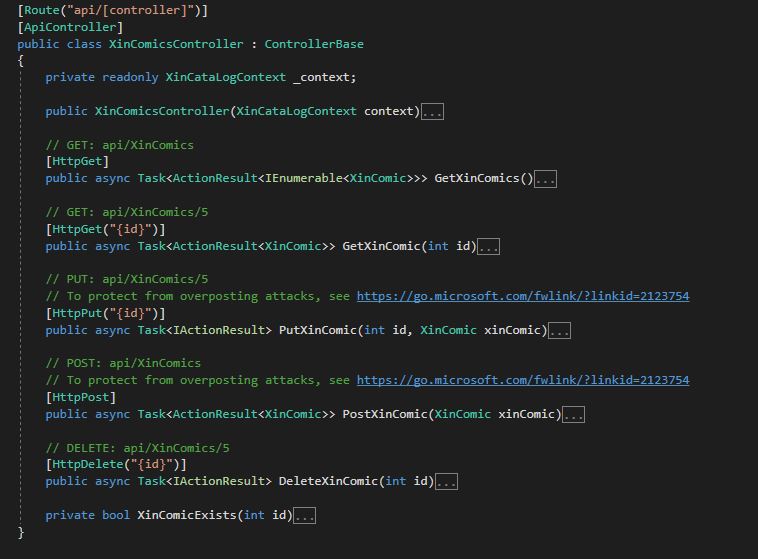
Since we have already a Model class created as above we can now move to create a Controller to implement the functionality above. To this let’s click on the Controller Folder and add a new controller like below
API Controller with Actions using EntityFramework
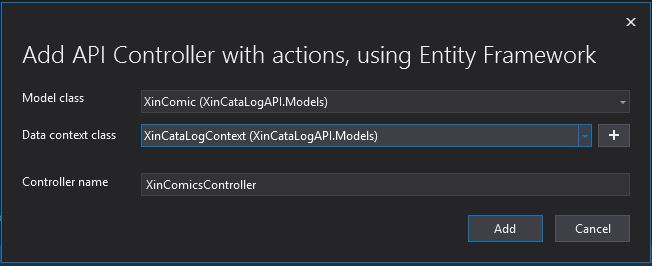
In the modal opening I just need then to specify the Model and the Repository created before
XinComicsController
Then, after some actions from the wizard you should get the Controller correctly created.
Actually the first time I did it I got a weird error “Unhandled exception. System.IO.FileNotFoundException: Could not load file or assembly ‘Microsoft.VisualStudio.Web.CodeGeneration.Utils, Version=5.0.2.0, Culture=neutral, PublicKeyToken=adb9793829ddae60’. The system cannot find the file specified. File name: ‘Microsoft.VisualStudio.Web.CodeGeneration.Utils, Version=5.0.2.0, Culture=neutral, PublicKeyToken=adb9793829ddae60′” which fortunately I solved with the help of StackOverflow [3]. If it is not the case for you better, otherwise this fixed the issue for me.
Here we go, now in the controller folder I have a all the CRUD operation for my Comic:
XinComicsController
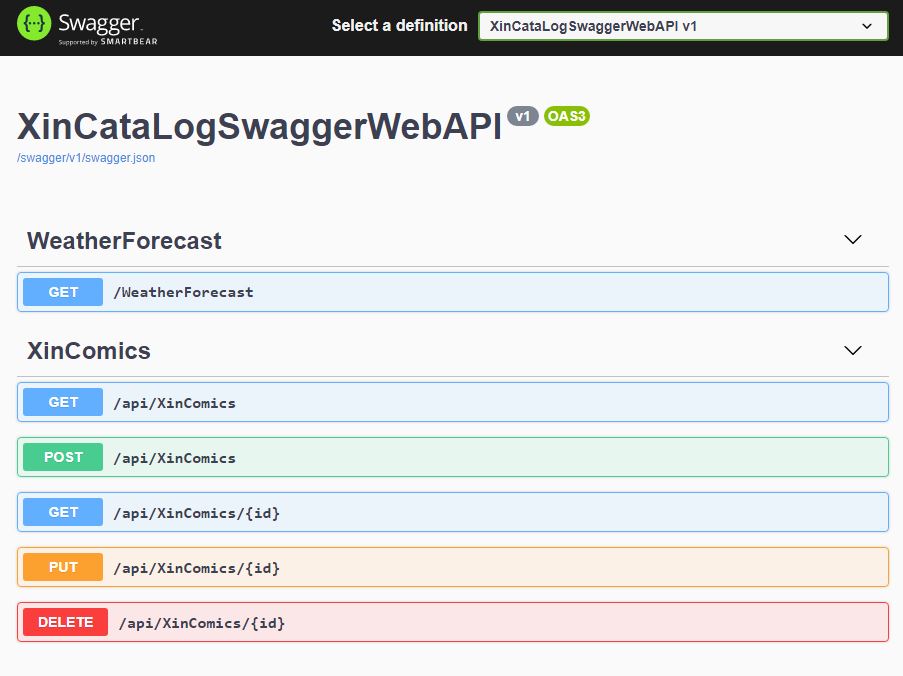
Well we should be almost there but if run the application we do find the new methods within the Swagger interface
XinComics methods
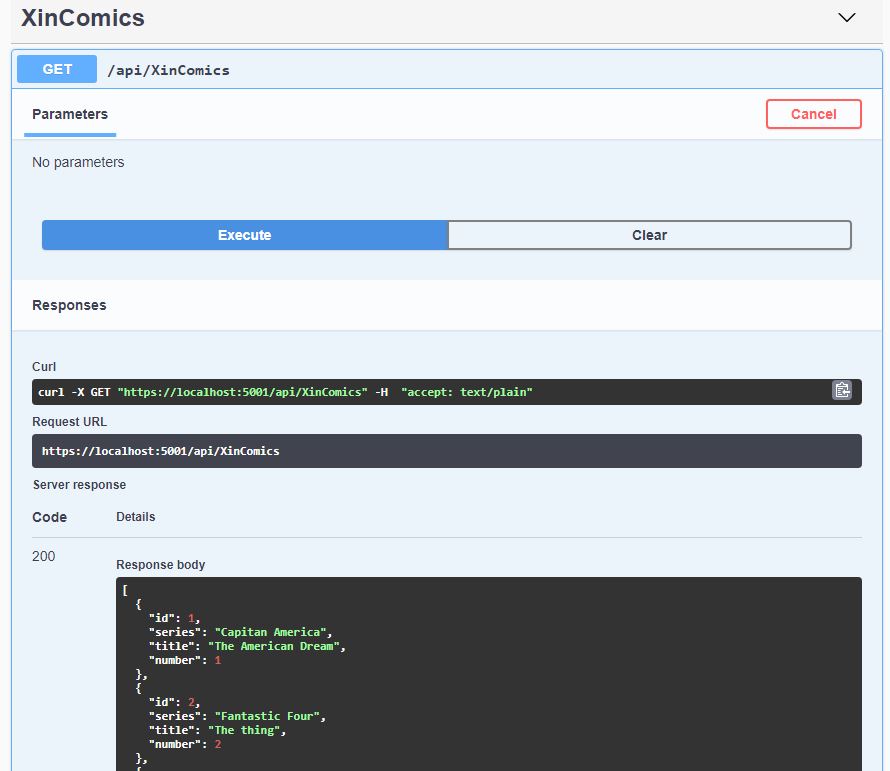
but if we run the get method we got an error:
System.InvalidOperationException: Unable to resolve servicefortype'XinCataLogSwaggerWebAPI.Models.XinCataLogContext'while attempting to activate 'XinCataLogSwaggerWebAPI.Controllers.XinComicsController'.
which is meaning that we have an issues with the initializzation of the XinCataLogContext. Actually we didn’t register the DataContext within the services and also described here [4].
Startup.cs
// This method gets called by the runtime. Use this method to add services to the container.publicvoidConfigureServices(IServiceCollection services){
services.AddDbContext<XinCataLogContext>(options =>
options.UseSqlServer(Configuration.GetConnectionString("DefaultSQLServerConnection")));
services.AddControllers();
services.AddSwaggerGen(c =>{
c.SwaggerDoc("v1",newOpenApiInfo{ Title ="XinCataLogSwaggerWebAPI", Version ="v1"});});}
The first line of the method is registering as DBContext the one we generated with the Scaffold-DBContext. Now before run again the aplication let’s add a connectionstring in the appsettings file to ensure the connection string is the right one.
That’s it: if you now run the app and try the methods they are working good: we got the first API (with swagger) basically writing only coupleof line of code: the large part of the actions are done by VisualStudio.
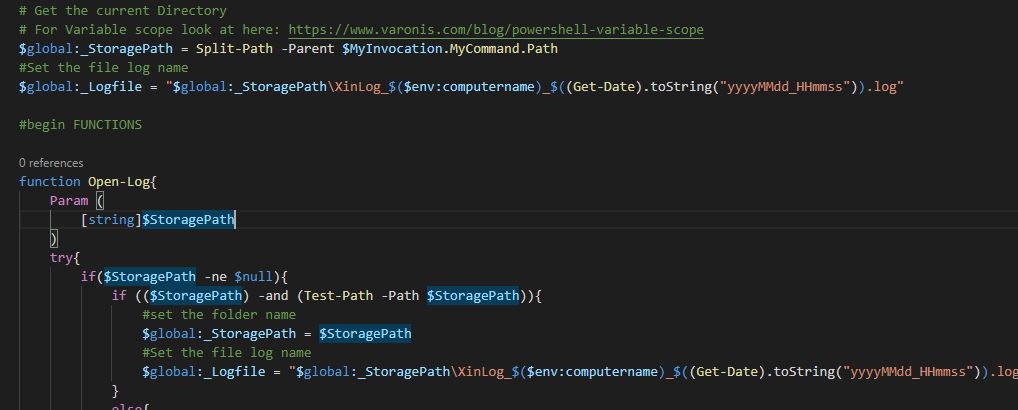
Still working on the improvement of the Log utility. As first I would like the user to decide where to log. As you may remember from my previous post the logs are all created in the same folder of the script. I twould be better to have the possibility to choose where to place them. for this reason I’m creating an Open-Log function which may tell the logger where to do it.
XinLog 1.1
# Get the current Directory$_StoragePath = Split-Path-Parent $MyInvocation.MyCommand.Path
#Set the file log name$_Logfile = "_StoragePath\XinLog_$($env:computername)_$((Get-Date).toString("yyyyMMdd_HHmmss")).log"functionOpen-Log{Param([string]$StoragePath)#set the folder name$_StoragePath = $StoragePath#Set the file log name$_Logfile = "$_StoragePath\XinLog_$($env:computername)_$((Get-Date).toString("yyyyMMdd_HHmmss")).log"}
If we invoke this Open-Log before use the Write-Log function, I would like the variable $_StoragePath to be intialized and then used each time I call the Write-Log. If you try like this you’ll see this is not properly working. Why? This is because the variable declared as above has a context limited to the same script which means that out of this is no more permanent. This is definetly bad for us since this means we need to re-initialize the XinLog each time.
We need to play with the context of the variables (please have a look to this document [1] which is very interesting). To fix we need to declare those variable as Global, this will extend the context to the whole process. It works!
# Get the current Directory$global:_StoragePath = Split-Path-Parent $MyInvocation.MyCommand.Path
#Set the file log name$global:_Logfile = "$global:_StoragePath\XinLog_$($env:computername)_$((Get-Date).toString("yyyyMMdd_HHmmss")).log"functionOpen-Log{Param([string]$StoragePath)#set the folder name$global:_StoragePath = $StoragePath#Set the file log name$global:_Logfile = "$global:_StoragePath\XinLog_$($env:computername)_$((Get-Date).toString("yyyyMMdd_HHmmss")).log"}
As you can see the only important thing to do is to use the prefix $global: for all the variable we need to extend to the whole process context.
Finally, as you may always need, let’s add some try-catch to avoid the unexpected issues to stop the Log to work. Here we go the XinLog 1.1 is ready to go (GitHub [2])
Looking back to the thread of the past weeks [1], I think it may be better to spend some minute more to create a separate library for loggin which can be reusable. Indeed logging is one of the most common activities and it would be great this functionality can stay in a separate file which I can just invoke in the context of my script when needed.
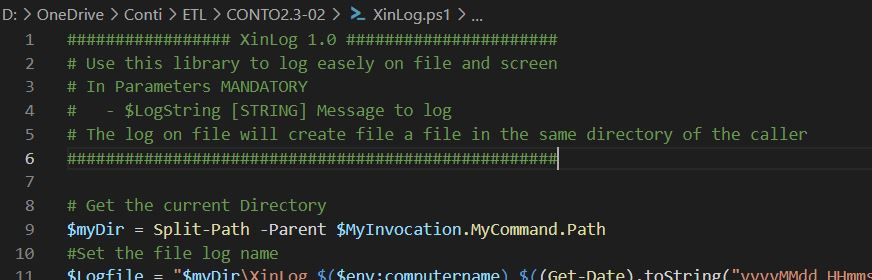
For this reason I’ll create a new ps1 file called XinLog where put all the logging logics:
################# XinLog 1.0 ####################### Use this library to log easely on file and screen# In Parameters MANDATORY# - $LogString [STRING] Message to log# The log on file will create file a file in the same directory of the caller#################################################### Get the current Directory$myDir = Split-Path-Parent $MyInvocation.MyCommand.Path
#Set the file log name$Logfile = "$myDir\XinLog_$($env:computername)_$((Get-Date).toString("yyyyMMdd_HHmmss")).log"#begin FUNCTIONSfunctionWrite-Log{Param([Parameter(Mandatory)][string]$LogString)$Stamp = (Get-Date).toString("yyyy/MM/dd HH:mm:ss")$LogMessage = "$Stamp - $LogString"Add-content$LogFile-value $LogMessageWrite-Host$LogString-ForegroundColor White
}#end FUNCTIONS
Actually I did’t do too much, I just extracted the lines related to logging from previous file moving the Write-Log function body which is the log writer.
Now the question is: How can I use Write-Log function if now it is in a separate file? The answer is really straightforward since as it is happening in a large part of languages it is possible to include a script in another one also in PoweShell. To do this we are leveraging on the “dot source notation” (you can find more information here [2]). In our scenario the original file Conto2.3 will change as below:
########### CONTO 2.3.1 ############# First test######################################### Inclueded Libraries ########### Get the current Directory$myDir = Split-Path-Parent $MyInvocation.MyCommand.Path
# Files included ."$myDir\XinLog.ps1"# Include the file logs#####################################begin BODYWrite-Log"Text to write"#end BODY
Here [3] you can find also a GitHub project I created for this purpose.
As said during the design [1], all the business logic related to the ET part will be in PowerShell. For people which may not know this language I can anticipate it is Microsoft product which can also be installed and used on Linux [2] even I’m not sure if it would make sense. This will give a more flexible and evoluted experience than the regular command line.
Start coding in PowerShell is very easy and you just need an Editor. I would suggest to use Visual Studio Code [3] which is free, light, it support a lot of languages and is also providing a debug mode which may help you a lot in your troubleshooting.
Coming back to our topic on first we need to design a way to log (on screen and on file) the actions the script is doing. To do that we’ll create an ad-hoc function named WriteLog which will print in the shell and on file what we desire.
Screen writing will be covered by Write-Host “text to write”
File writing will be covered by Add-content File -value “text to write“
In the file output we are also adding a timestamp for each row we write.
WriteLog
function WriteLog
{Param([Parameter(Mandatory)][string]$LogString)$Stamp = (Get-Date).toString("yyyy/MM/dd HH:mm:ss")$LogMessage = "$Stamp - $LogString"Add-content$LogFile-value $LogMessageWrite-Host$LogString-ForegroundColor White
}
As first statement you can find the word Param: this is used to delcare the parameter for the function. In this case it is the text to log and it is marked as Mandatory since there is no log without a text to log.
Let’s try it out then
WriteLog "Text to write"
Executing the script from Commnad Line (or in the Visual Studio Code IDE) we’ll get the text we are expecting the response of the shell.
Esempio di WriteLog
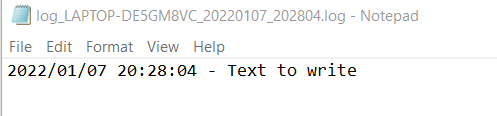
Good but not enough since we want also to write to a phisical file and to do this we need to identify the file to write and place it in the same folder where the script is located.
In the first row we are getting the path of the folder of the script and store it in the variable . In the second line we are adding the file Log name composed as the machine name plus a timestamp in order to write a different file at each run.
Running again the script we now have a file log in the folder.
Created file log
File log content
Please take note on how is simple to do a string concatenate in PowerShell using variables: $LogMessage = “$Stamp – $LogString” we are just writing the variables (starting with $) within the text. Quick and smart.
Resuming: we just created a first version of the PowerShell Script which is logging at screen and on file a text sample. You may see that to easy read it the function WriteLog is located on top of the script while it will be invoked only later in the bottom part. Thi is not mandatory, the script still works if you put the function declaration after the piece invokin it. It is just a convention.
#begin FUNCTIONSfunction WriteLog
{Param([Parameter(Mandatory)][string]$LogString)$Stamp = (Get-Date).toString("yyyy/MM/dd HH:mm:ss")$LogMessage = "$Stamp - $LogString"Add-content$LogFile-value $LogMessageWrite-Host$LogString-ForegroundColor White
}#end FUNCTIONS# Get the current Directory$myDir = Split-Path-Parent $MyInvocation.MyCommand.Path
#Set the file log name$Logfile = "$myDir\log_$($env:computername)_$((Get-Date).toString("yyyyMMdd_HHmmss")).log"
WriteLog "Text to write"
You can download here [4] the zip with the script to try it on your own.
If you land to this post probably it’s because you have some interest on the topic (see all the requirements here) and we can now move to define more in details how this process should work:
define how to structure the input/output focusing on who does what
define how to configure the above in a way which will gave us an high level of scalability and reusability
design a logging system in order to monitor and analyze which are the actions taken by the system helping the troubleshoting
1) Input and Ouput Definition
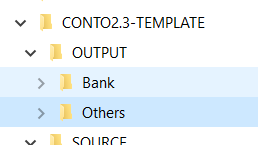
Once the information are extracted from the source they need to be exported to an OUTPUT folder also divided in two different folders which will contains all the original files in the same format and without any difference based on the owner, and this will simplify a lot the Exel job
Configurazione Cartelle di output
The last step is on Excel itself which will load those files and will populate some spreadsheets in order to correctly display them in a proper Pivot table.
There is stil one part miss tough which is the Mapping. Who is mapping the information in the files and where this mapping is coming from? Unfortunately this is the most painful part, since my expectation is to manage the mapping in a totally separated Excel file where I can define whether a description is categorized in a way or another. This is the tricky part an the reason why Excel is not enough but we need PowerShell help. Basically, just right after the script run it will load all the mapping information and then it will reuse them to correctly map the expenses in a way easy to be managed by Excel.
2) How to configure the process
All what we said so far it just the base logic but in order to easely maintein and extend the process we need a configuration file which will tell where to find the files and the information within the files. This is key to avoid change code in case of any change in the sources.
3) How to log
Finally, in order to have a good level of details on what we the process did so far we need a way to log the actions for an easy troubleshooting
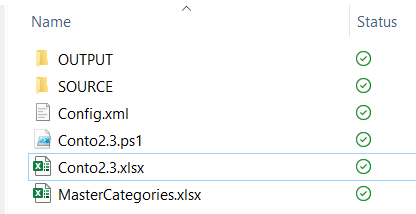
Root Folder
To resume:
Config.xml: it’s the file containing the configuration
Conto2.3.ps1: it’s the file where the ET (Extract and transform) logics will be performed
Conto2.3.xlsx: it’s the Excel file which will manage the L (Load) and create the Pivot
MasterCategories.xlsx: it’s the file used for the mapping during the ET phase
As said we would like to handle different file types coming from different sources: the bank account details, the credit card report and as well the owner: if me and my wife have different banks probably the source file will be different.
Source folder architecture
Theorically I would add asd much owner as I want, keeping a structure which may present the bank on first and then other sources. In thos folder I would also load the files as is without doing any manipulation
A PowerShell script which will be in the root folder will load those files and will normalize them. When I say normalize I mean to find a set of columns which are mandatory for the system:
Data Operazione: the time of the spend
Causale: brief indication of the reason
Descrizione: a detailed info around the spend
Ammontare: it is the the value of the spend
Accredito: I noticed that in some cases we have found inbound placed in a different column from the outbound (Ammontare)
Once the information are extracted from the source they need to be exported to an OUTPUT folder also divided in two different folders which will contains all the original files in the same format and without any difference based on the owner, and this will simplify a lot the Exel job
Configurazione Cartelle di output
The last step is on Excel itself which will load those files and will populate some spreadsheets in order to correctly display them in a proper Pivot table.
There is stil one part miss tough which is the Mapping. Who is mapping the information in the files and where this mapping is coming from? Unfortunately this is the most painful part, since my expectation is to manage the mapping in a totally separated Excel file where I can define whether a description is categorized in a way or another. This is the tricky part an the reason why Excel is not enough but we need PowerShell help. Basically, just right after the script run it will load all the mapping information and then it will reuse them to correctly map the expenses in a way easy to be managed by Excel.
2) How to configure the process
All what we said so far it just the base logic but in order to easely maintein and extend the process we need a configuration file which will tell where to find the files and the information within the files. This is key to avoid change code in case of any change in the sources.
3) How to log
Finally, in order to have a good level of details on what we the process did so far we need a way to log the actions for an easy troubleshooting
Root Folder
To resume:
Config.xml: it’s the file containing the configuration
Conto2.3.ps1: it’s the file where the ET (Extract and transform) logics will be performed
Conto2.3.xlsx: it’s the Excel file which will manage the L (Load) and create the Pivot
MasterCategories.xlsx: it’s the file used for the mapping during the ET phase
This website uses cookies so that we can provide you with the best user experience possible. Cookie information is stored in your browser and performs functions such as recognising you when you return to our website and helping our team to understand which sections of the website you find most interesting and useful.
Strictly Necessary Cookies
Strictly Necessary Cookie should be enabled at all times so that we can save your preferences for cookie settings.
If you disable this cookie, we will not be able to save your preferences. This means that every time you visit this website you will need to enable or disable cookies again.